So if you are in the Moray/ Banffshire area and fancy making this Christmas wreath then give me a ring. Booking is essential and let me know your colour scheme.

Hope to see you soon
Sarah

So if you are in the Moray/ Banffshire area and fancy making this Christmas wreath then give me a ring. Booking is essential and let me know your colour scheme.
Hope to see you soon
Sarah


Its that time of year again when we say goodbye too some much loved stamps and embellishments and say hello to a new seasonal mini, well not so mini this time as the new catalogue is big and bursting, lol.
As of today you can order from the new Autumn/Winter Catalogue, and the new Annual Catalogue is just a month away.

Here is the link for the Seasonal catalogue.
I have catalogues available so if you would like to purchase one, just email me and i will sort it for you.
But not only that, Stampin Up! have announced the retiring list for this year. BE WARNED – EVERYTHING SELLS QUICKLY – so if there is something on the list that you want, order it IMMEDIATELY to avoid disappointment and beating yourself up.

Here is the link to the Retired STAMPS List – updated daily
Here is the link to the Retired ACCESSORIES List – updated daily
And as a special treat i am offering the chance of winning a fifteen pound SU voucher for anybody who places a order of Fifty pound by the end of September.
So what you waiting for, get browsing that new mini and craft away. As always, I am just at the end of an email for Questions and orders.
TFL Sarah
So over on my other blog, Welcome to Smelly Blog, i have shared part 1, a step by step tutorial on how to make a simple chipboard box.
But here i will share part 2 of the tutorial on how to adapt the box into a keepsake gift.I have left my wrap blank on the inside but you could certainly add pockets for gift cards, mini albums etc.
 Materials
Chipboard Patterned paper-Twitter patted Wet glue card stock Ribbon-Seam binding, Baja breeze Build a bloom stamp and punch Antique Brads Matching inksBegin by making your box using the tutorial provided.

Next cut your chipboard pieces for the wrap. 4 1/2 " x 4 2/8" (3 pieces), 2 3/8" x 4 2/8( 2 pieces)

Begin by placeing them onto a piece of crumbcake card stock. You will need 2 pieces of card stock due to the overall length of the wrap so you will need to make a join. Use a good quality wet glue to stick down. Mitre the corners and fold the excess inside.


Next trim a piece of cardstock slightly smaller than the wrap and glue down over the cardstock used to cover. Again you will need to piece it. Use a bone folder on the creases.

Next i cut a square into the front panel. Mark and measure with a pencil and ruler and cut out. ink and sand the edges. Attach a piece of ribbon at this stage to make the closure.

Take a patterned paper and measure and cut slightly smaller than each individual panel. Ink the edges and attach to the panels both inside and out. i used different papers fro the front and different for the inside.


Next use the wet glue to stick your previously made box onto the wrap. I made a chipboard square slightly smaller than the cut square, decorated with patterned paper and added to the lid panel.

To finish, i stamped flowers and leaves and added them to the cover. You may also need a bit of velcrow on the top to keep shut.


 TFL
Sarah
TFL
Sarah

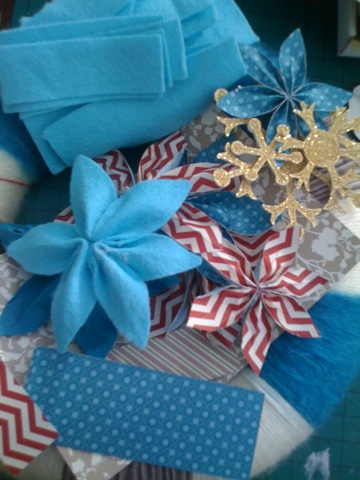
Take a piece of patterned paper or cardstock measuring 12" wide x 8" high. Draw pencil lines every 1/2" across. Repeat going upwards. Carfully begin drawing in diagonal lines. At this stage you can make each chevron thick or thin.


Carefully cut them out and arrange them in strips on your page.


And do you notice the barn stars. They are very easy to make. Roughly draw a 5 pointed star onto card as a template. Draw around it onto card or patterned paper. Cut it out.


Take your score board and score down every point. Bend the top points mountain and the inner points valley, IYKWIM.

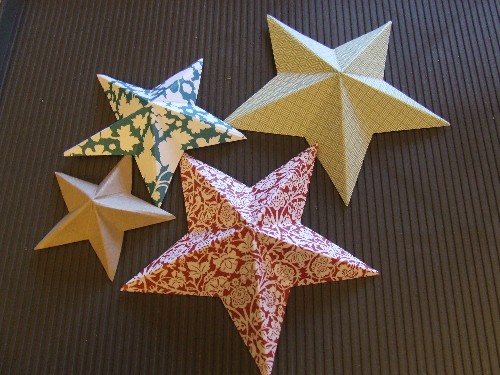
Add to the layout. I used wet glue on the underside of the points to secure.


Materials Used Stampin Up Twitterpated designer series paper 12 x 12 Crumb cake cardstock. Perfect pairs stamps Black Stazon
And i will leave you with a simple card i made from the scraps.

Materials Used Twitterpated Attic Boutique 12 x 12 crumb cake Seam ribbon
TFL Sarah
The original one i found by Heidi Baks and whose instructions i followed can be found HERE. I had to tweek mine a little bit as i didnt have 16th on my score board.


 Materials used
124274 Crumb cake 12 x 12 card stock 125407 Attic boutique Designer series paper 106550 Very vanilla card stock 106549 Whisper white Card stock 101406 Black stazon 125598 Framelit dies 121686 Early Expresso Card stock 119670 Classic stamp pad Early Expresso 121812 Sixxix fun die 119667 Classic stamp pad Daffodil delight 125582 Pool Party seam binding ribbon 122976 Ruffled ribbon Calypso CoralAnd here is a quick how to on making the flower at the top. Cut 2 of each flower from the fun flower die using whisper white card stock. Put them to soak in water. Make a "O" with your finger and thumb. Gently place a flower over the "O". Using a pen, push the flower into the "O". Carefully wrap the flower around the pen. Remove the pen, tighten the wrap of flower. The tighter the wrap, the more texture you get. Leave to dry over night. Next day, carefully open the flower. Glue all the layers togther with a hot glue gun. To colour, i misted the flower with water. Made a pale wash of colour using a ink pad and aqua brush and coloured the whole flower. I dried with a heat gun. Next i made a concentrated wash of colour and dipped the flower into it. This gives the Ombre effect, Darker colour graduating to paler in the middle. TFL Sarah

 Can you spot a new trend sweaping the internet, Ombre.
shaded or graduated in tone: said of a colorMy flower made from the fun flower die is graduaed in colour as is the embossed card. I have also made chevrons in varying shades of blue but i dont think they will go on the layout ombre style. TFL Sarah